Physical Address
304 North Cardinal St.
Dorchester Center, MA 02124
Physical Address
304 North Cardinal St.
Dorchester Center, MA 02124
Writing is slow when you plan, research and edit at once. Split it into 3 blocks and use these 7 AI shortcuts, each with a prompt to copy.
It’s 9 p.m. The post you planned to finish this morning is still a title and two half paragraphs. You’ve rewritten the first line four times, checked one fact twice and opened six tabs of “research”. If you’re looking up how to write blog posts faster, that evening probably sounds familiar.
Most tips tell you to type faster or “just write”. But typing is rarely the slow part. The slow part is doing three jobs at once: deciding what to say, checking what’s true and fixing how it sounds. Each job interrupts the others, so you keep starting over.
The fix is to split those jobs into three blocks and give AI the boring part of each one. I call it Plan, Talk, Check. The prompts below are written for Claude, but they are plain text, so they also work in ChatGPT.
Below are 7 smart AI shortcuts, spread across those three blocks. Every AI step has a prompt you can copy. One made-up example post runs through all of them, so you can see what you should get. You can try the whole system on your next post today. Plan for about 30 minutes per block, so roughly 90 minutes for a first post. That is my suggestion, not a measured result, so time yourself and compare it with how long a post usually takes you.
In short
What you need
On this page
You sit down to write, and nothing comes out. Or a paragraph comes out, you don’t like it, and you delete it.
That’s not a typing problem. A blog post is three different jobs: deciding what to say, researching what’s true and editing how it sounds. Do all three at once, and you write a line, stop to check a fact, come back, fix a word and lose the thread.
So before any shortcut, there’s one rule: one job per block. Here is how the 7 shortcuts fit into the three blocks.
| Block | Your job | Claude’s job | Shortcuts |
|---|---|---|---|
| 1. Plan | Decide the point, the reader and the facts | Writes the brief, fills your template, sums up your sources | 1, 2, 3 |
| 2. Talk | Say your draft out loud | Sorts your words into sections | 4, 5 |
| 3. Check | Make the fixes | Flags filler, missing steps and claims with no source | 6 |
| Every block | Keep what works | Nothing: you save the prompts | 7 |
A block can be one hour or one evening. If you can, do each block in a different sitting, so you come to it fresh. That’s my suggestion, not a rule.
A blank page is slow because you decide everything while you write: the title, the order and the examples, all at once. Block 1 takes those decisions out of the writing. Two shortcuts do most of the work.
A brief is a short plan for one post: who it’s for, what question it answers and what goes in each section. My guide to the AI content brief has a full free template. Here is the fast version.
Copy this prompt (Brief):
I want to write a blog post. Help me plan it before I write.
Topic: [YOUR TOPIC]
Reader: [WHO IT IS FOR, e.g. freelancers who work alone]
My notes: [PASTE YOUR NOTES, LINKS OR IDEAS]

Make a one-page brief with:
1. The one question the post answers, in the reader's words.
2. The reader's main problem and what they have already tried.
3. A working title.
4. 5 to 7 section headings in a sensible order, with one line on what each covers.
5. The facts I need to check, and where I could check them.
6. 3 questions about my own experience with this topic.
Rules: keep it short. Don't invent facts, numbers or quotes. If my notes are too thin, ask me questions first.
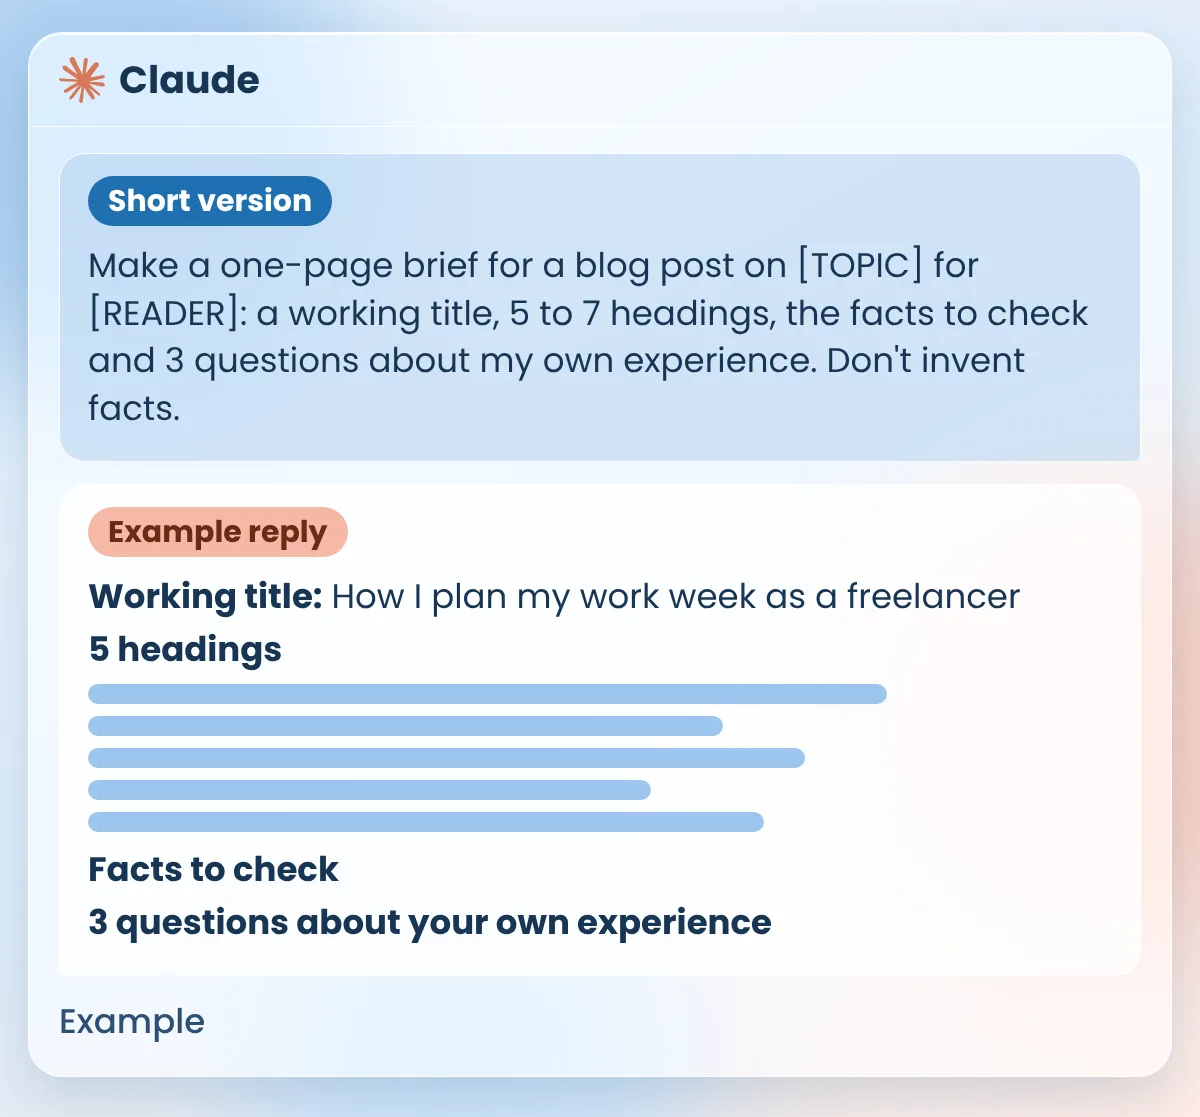
Short version (for a quick test): Make a one-page brief for a blog post on [TOPIC] for [READER]: a working title, 5 to 7 headings, the facts to check and 3 questions about my own experience. Don’t invent facts.
What you should see: a one-page brief with the six parts, ending with three questions about your own experience. Answer them in a few lines each. Those answers are the part no AI can write for you, and they make the post sound like you.
If every post starts from zero, you rebuild the same shape every time. A template is that shape, saved once.
Copy this template:
MY POST TEMPLATE
Title: a number + a benefit + my keyword
Intro: the reader's problem, why they're stuck, what this post gives them
In short: 3 to 4 bullet points
Each section: the problem in the reader's words, the answer, one example
Watch out: one honest limit
FAQ: 3 to 5 real questions with short answers
Ending: one small next step
Copy this prompt (Fill the template):
Use the brief above and my answers to your questions.
Fill in each part of my post template below with short bullet points only.
Use only what is in the brief and my answers.
Don't write full paragraphs. I will write those myself.
Where something is missing, write GAP and tell me what to add.

MY POST TEMPLATE:
[PASTE YOUR TEMPLATE]
What you should see: your template with a few bullet points under each part, and a GAP note wherever something is missing. This filled template is your outline for Block 2. Copy it into your notes.
Good to know
If Claude writes full paragraphs anyway, reply: “Bullet points only, please.” Full paragraphs at this stage pull you back into editing before you have a draft.
Research is where an hour disappears. You open one link to check a number, then another, and soon you’re reading something that has nothing to do with your post.
Batching means doing one kind of task in one sitting, then stopping. For research, that means you find and sum up all your sources before you write a word. If you write more than one post a week, try planning both posts in the same sitting, so you don’t have to switch back into planning later (my suggestion).
Copy this prompt (Sources):
I'm researching a blog post about [YOUR TOPIC].
Below I've pasted text from a few sources, each with its link.
For each source, list:
- The facts that matter for my post, in plain words.
- The link it came from.
Then list any facts that two sources disagree on.
Rules: use only the text I pasted. Don't add facts from memory.
If something I need isn't in the text, write "not in the sources".

SOURCE 1 (link + text):
[PASTE]
SOURCE 2 (link + text):
[PASTE]
What you should see: a short list of facts under each source, with its link, and a list of anything the sources disagree on. Copy this list under your outline, so every fact sits next to its link when you write.
Watch out
Claude can make mistakes, even with your text in front of it. Before a fact goes into your post, open the link and find it on the page yourself. If you can’t find it, leave the fact out.
You can probably explain your topic to a friend in a few minutes. Typing the same thing is slower, because you stop to fix every sentence as you go.
So in Block 2, you don’t type. You talk through your outline, then Claude puts your words in order. Your ideas and your examples stay yours. Claude only sorts and cleans.
Three ways to turn your voice into text:
Buttons and menu names can change. If yours look different, check the help page linked for your tool.
Good to know
Copy this prompt (Voice note):
Below is a voice note I recorded for my blog post. It's messy and has little punctuation.
Below it is my outline.
Sort what I said into the sections of my outline.
Rules:
- Keep my words and my examples. Only fix grammar, punctuation and order.
- Don't add new ideas, facts, numbers or examples.
- If a section has nothing from my voice note, write MISSING under it.
- If something I said is unclear, write CHECK next to it.

MY VOICE NOTE:
[PASTE THE TEXT]

MY OUTLINE:
[PASTE YOUR FILLED TEMPLATE]
Short version (for a quick test): Sort this voice note into the sections of my outline. Keep my words. Fix only grammar and order. Don’t add anything. Write MISSING where a section is empty.
What you should see: your outline with your own sentences under each heading, cleaned up. Sections you skipped say MISSING, and unclear lines say CHECK. Read it once to make sure Claude kept your meaning.
Now copy it into your editor, such as WordPress or Google Docs. Fill each MISSING part with a few lines in your own words, and turn the sections into full paragraphs. For a full walkthrough of that drafting part, see how to write a blog post with AI that still sounds like you.
Editing drags on when you don’t know what you’re looking for. You reread the whole post, change a few words, then reread it again.
A checklist ends that loop. Claude reads your draft against a fixed list and points to the lines that need work. You make the fixes yourself, so the voice stays yours.
Copy this prompt (Checklist):
Check my blog post draft below. Don't rewrite it.
Give me a table with 3 columns: the line, the problem, a short fix.
Look for:
1. Filler: lines that say nothing new.
2. Phrases that sound like AI, such as "in today's fast-paced world".
3. Steps a beginner can't follow: no click path, or nothing to copy.
4. Claims or numbers with no source.
5. Paragraphs longer than 3 sentences.
6. Headings that don't match their section.
After the table, tell me the one change that would help my reader most.

MY DRAFT:
[PASTE YOUR DRAFT]
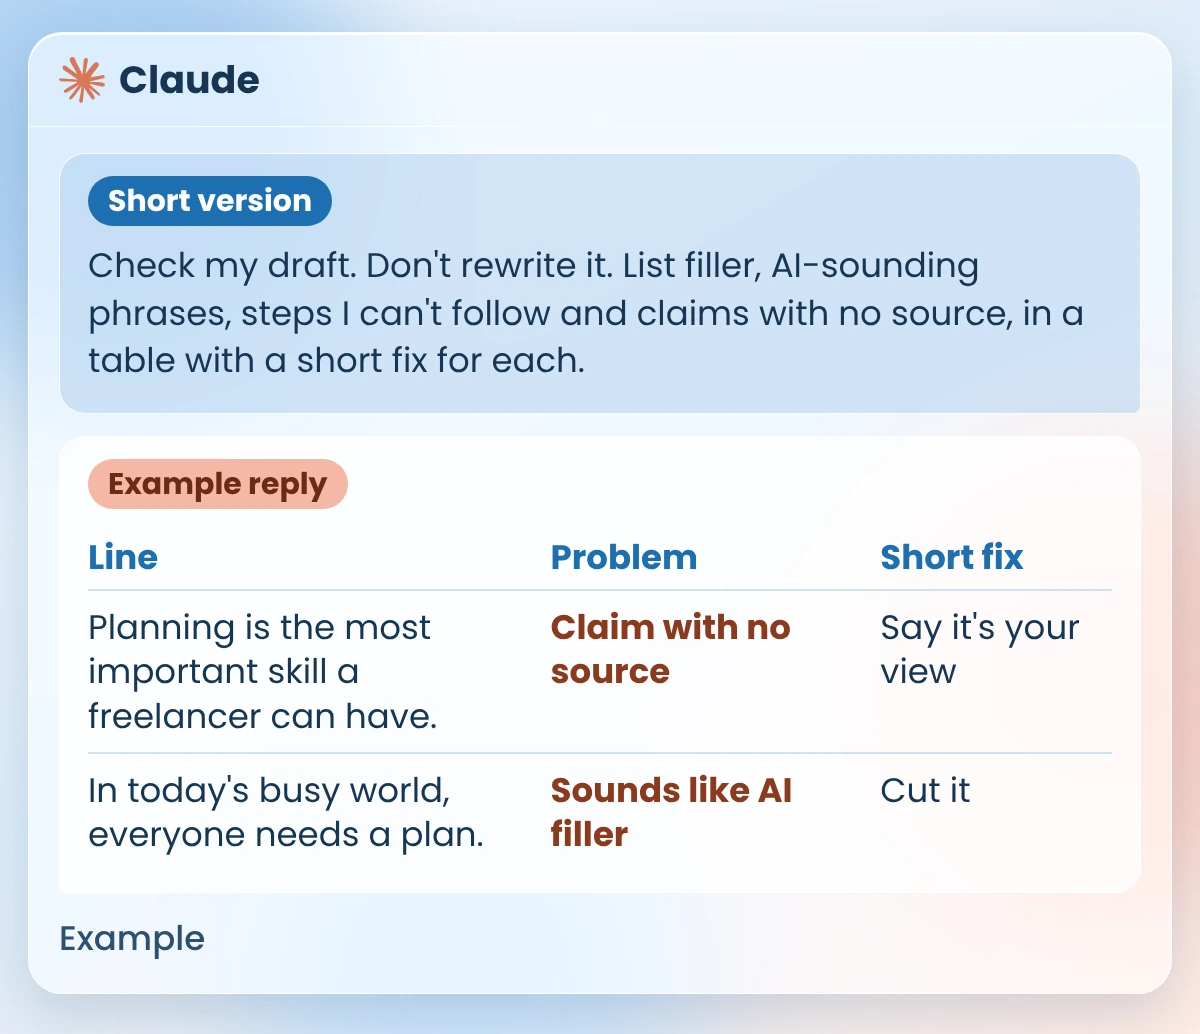
Short version (for a quick test): Check my draft. Don’t rewrite it. List filler, AI-sounding phrases, steps I can’t follow and claims with no source, in a table with a short fix for each.
What you should see: a table of lines from your draft, each with its problem and a short fix, then one change that would help your reader most. Claude doesn’t hand back a rewritten post, because the prompt tells it not to.
After the fixes, proofread last. My list of AI proofreading tools has a free prompt for that final pass. And if your draft started as AI text and feels flat, work through how to edit AI content so it sounds human before the checklist.
Next week, you probably won’t remember exactly how you worded the prompt that worked. So you type a weaker version, get a weaker result and fix more by hand.
Make one note called blog prompts in your notes app or a Google Doc. Paste in six things from this post:
Each time you change a prompt and the result gets better, update it in the note. Every new post then starts from your best version, not from a blank chat.
Steps are easier to trust once you see them on a real-looking post. So here is the whole system on one made-up example.
Example: Nora (a made-up freelance designer) blogs about running a one-person business. This week’s post is “How I plan my work week as a freelancer.”
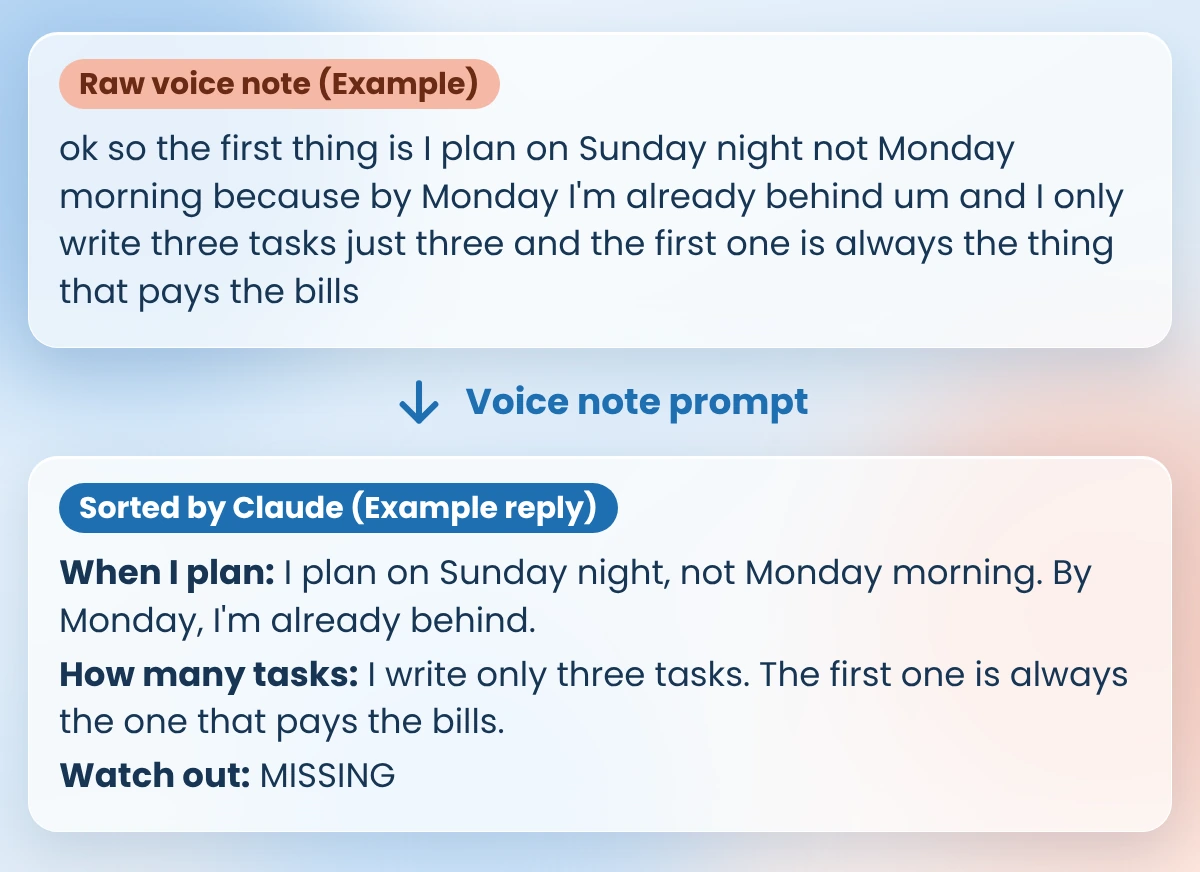
Notice what Claude did and didn’t do. It planned, sorted, cleaned and flagged. Every idea, example and final decision in the post is still Nora’s.
Once posts get faster, the next worry shows up: “Am I posting enough?”
I won’t give you a magic number. I haven’t seen a source I trust that proves one number works for every blog, so I’m not going to invent one.
Here’s my suggestion instead. Pick a pace you can keep for the next three months, even in a busy week. One finished post a week that really goes live is worth more than three planned posts that never do (my view).
If the three blocks save you time, you get to choose what to do with it: a second post, or a better first one. Both are fine choices.
You don’t have to take my word that this is faster. Time it on your own blog.
Want a starting point? Try about 30 minutes per block on your first post. That’s my suggestion for a first try, not a measured result. Add the three times together, then compare the total with how long your last post took you. Next time, look hardest at the slowest block. That’s where your next shortcut is hiding.
Stop planning, researching and editing at the same time. Split the work into three blocks: Plan, Talk and Check. Use AI for the brief, for sorting your voice note into sections and for a checklist pass, and keep the ideas and final fixes yours.
I haven’t seen a trustworthy source that proves one number fits every blog, so I won’t invent one. My suggestion: pick a pace you can keep for three months, even in a busy week. A steady pace you can keep beats a burst you can’t (my view).
Yes, if the post fully answers the reader’s question. In my view, the topic should decide the length: a one-step answer can be short, and a full how-to needs more room. Don’t add words just to reach a word count.
Yes, as a helper. Let AI plan, sort and check, and keep the facts, examples and experience yours. Check every fact against a source before you publish. My guide on how to write a blog post with AI shows how to keep your own voice.
Start with the reader’s problem, then give the answer in clear steps. Use short paragraphs, headings people can skim and one real example. End with one small next step. The post template in Shortcut 2 follows this shape.
Yes. The prompts are plain text, so you can paste them into ChatGPT or another chat assistant. The replies will look a little different, so check them the same way.
You don’t have to change everything at once. On your next post, try only the Plan block: let Claude write the brief and fill your template. Even that one block means you never start from a blank page again.
Then add Talk and Check, one post at a time. That’s how to write blog posts faster without losing what makes them yours.
Want more copy-ready AI workflows like this one? Grab my free AI Workflow Starter Kit. And for more guides, browse the blog.

12+ years in digital marketing. I test every workflow on real work before I share it, free tools first.
More about me →Steps, a copy-paste prompt and the limits I found. Free, nothing to buy.
Get the Free Starter Kit →